Install Zerto Virtual Replication Appliance VRA on VMware ESXi
Hi all,
Today we will discuss about how to install Zerto Virtual Replication Appliance VRA on VMware ESXi. In my previous post we discussed about how VRA works in Zerto enabled environment.
Previous Zerto Posts:-
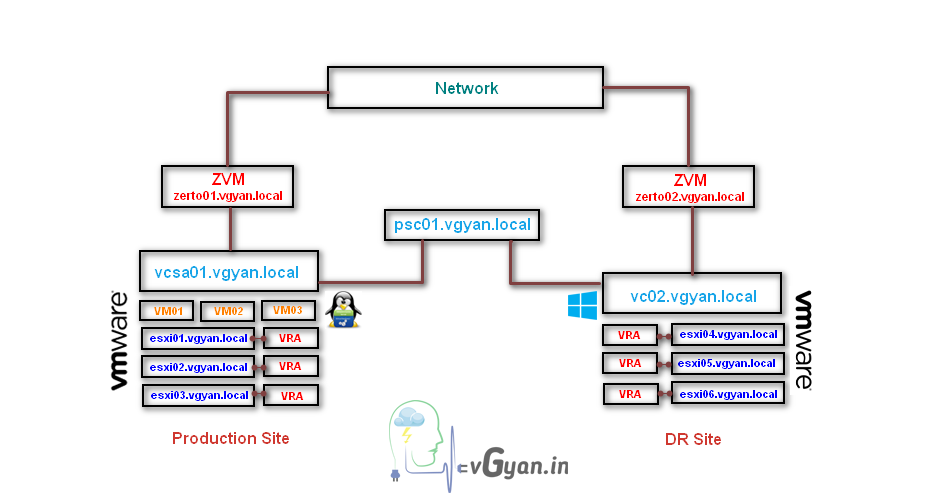
Below screenshot shows how I created my Zerto lab environment.
 Lab environment created for Zerto VMware to VMware DR test.
I am in my Zerto Virtual Manager (ZVM) web client.
Go to setup menu, in the setup page we can see all the available esxi hosts attached to the protected site vCenter Server.
Select any ESXi host and click on NEW VRA button in the right top.
In configure and install VRA field,
Select any ESXi host from the drop-down menu.
I am selecting my first ESXi host in my protected site: esxi01.vgyan.local
Select “use credentials to connect to host”
Provide Host Root Password: ****** (ESXi root password)
Select any available datastore for VRA installation.
Datastore: vGyan-NFS-01
Network: DC01-REP (created separate vDS for replication traffic)
VRA RAM: 1 GB ( by default it’s 3 GB)
VRA Group : I am going with default_group
If you have more numbers of ESXi host or number of clusters you can create a separate VRA group for logical separation.
Provide VRA Network details,
Configuration: Static (best practice)
Address: 192.168.0.132
Subnet mask: 255.255.255.0
Default gateway: 192.168.0.1
Click on INSTALL for installing new VRA on ESXi01.
VRA installation in progress..
In the vSphere web client I am able to see a new Z-VRA-esxi01.vgyan.local
But in the ZVM web client the installation failed. I checked with error log and find out the issue.
As I said my complete test environment is running on a nested esxi environment, VRA VM is coming with x64 Debian linux. So I have to enable x64 support on my nested ESXi Server.
For enabling x64 OS support on nested ESXi host, Blog post from VMware Arena
I enabled x64 OS support on all the esxi host in my test environment.
Click on Retry Installation Option.
We have to provide Host Root Password again, rest all inputs will be available in the configuration filed.
Click on INSTALL option.
I have completed VRA on all the available ESXi hosts in protected site.
Same I have completed in Recovery site as well.
In the vSphere web client, I am able to see all the installed VRA instance.
Edit Installed VRA
If you want to edit VRA, click on edit option attached to the VRA name filed, or select any VRA and click on MORE options to get VRA Edit option.
Once you open the edit VRA option, provide esxi root password, make the changes and click on SAVE button.
Uninstalling VRA
If you want to uninstall a VRA instance, click on remove button attached on VRA Name field or select ESXi host and click on MORE option and click on uninstall option.
Note:- In a production environment we need to perform some more pre checks and tasks before uninstalling a VRA instance. We will discuss about that later.
Click OK to uninstall VRA.
For VRA properties, double click on any VRA instance in the VRA name field.
Once the VRA page opens, we can find all the available properties like CPU usage, Local memory usage, remote memory usage, Events, running task etc..
We successfully installed VRA on both Protected site and Recovery site.
We will discuss about more on Zerto in upcoming posts.
I hope you enjoyed reading this post. Feel free to share this to others if it is worth sharing!!!


