
How to Deploy Veeam Backup Enterprise Manager
Hi all,
Today we will discuss how to deploy Veeam Backup Enterprise Manager. Before getting into deployment lets discuss what is Veeam Backup Enterprise Manager and how it works.
Veeam Backup Enterprise Manager is an optional web-based management and reporting console for Veeam Backup & Replication. This will enables users to manage multiple Veeam Backup & Replication installations from a centralized web console, providing a convenient and consolidated view of your distributed deployment.
Below options are available with Veeam Backup Enterprise Manager, here is the Veeam’s official documentation for the same.
- Manage jobs across a number of Veeam backup servers.
- View on-going reporting data for all jobs running on these servers, set up email notifications to get information on the status of all jobs.
- Search for machines, file shares, and guest files in backups and replicas.
- Perform recovery operations for VMs and physical machines, including 1-Click restore, 1-click guest OS file restore and application items restore (for Microsoft Exchange mailboxes, Microsoft SQL Server databases and Oracle databases); perform 1-Click restore for file share backups.
- Centrally manage and update licenses to ensure compliance.
- Delegate permissions for restore operations to personnel in charge.
- Manage VMware vCloud Director organizations and support their administrators with the Veeam Self-Service Backup Portal.
- Manage vSphere user accounts and support them with the vSphere Self-Service Backup Portal.
- Install vSphere Web Client plug-in on vCenter servers.
- Implement data encryption and decryption processes for Veeam solutions.
- Provide operation automation via Veeam Backup RESTful API.
Here is the official video from Veeam – What is Veeam Backup Enterprise Manager and how can it help you?
Video Credit: Official Veeam YouTube Channel
How does Veeam Backup Enterprise Manager work?
Veeam Backup Enterprise Manager collects data from multiple Veeam backup servers, as well as from the underlying VMware vCenter servers. Here is the Veeam’s official documentation for the same.
- Veeam Backup Enterprise Manager retrieves data from the managed Veeam backup servers using a data collection job. This job gets information about the backup and replication jobs, processed machines, and other data from the Configuration databases used by Veeam backup servers.
- Collected data is stored in the Veeam Backup Enterprise Manager database and can be accessed by multiple users via the web interface. This web interface also allows for modifying Veeam job settings, license management, installing Veeam plug-in on the vCenter server, and other tasks.
- When a user modifies a backup job using Veeam Backup Enterprise Manager, these changes are communicated to the corresponding Veeam backup server and stored in its configuration database.
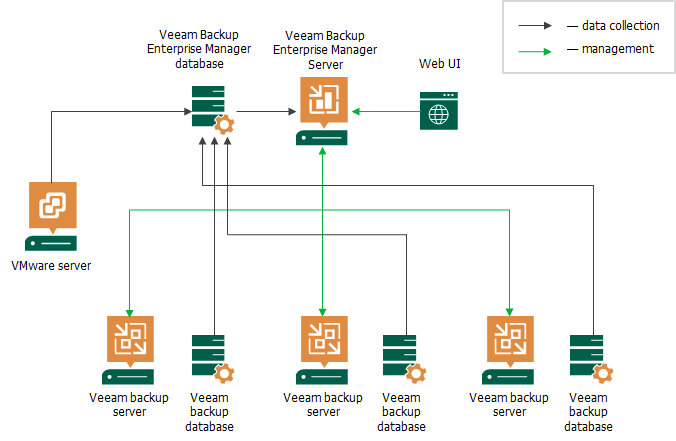
Image Credit: Veeam.com
Let us discuss how to install Veeam Backup Enterprise Manager, I will be installing Enterprise manager along with Veeam backup server as this is my lab environment, If you have a large production environment with multiple Veeam Backup servers, you may consider deploying a separate server for deploying Enterprise Manager.
Let’s discuss the prerequisites before proceeding installation.
Here are the official Veeam documents for installation prerequisites.
Hardware Requirement
CPU: x64 processor
Memory: 4 GB RAM (minimum recommended).
Hard disk space: 2 GB on the system disk (required to extract all components from the setup package during the product installation).
Network: 1 Gbps recommended due to backup performance considerations.
OS Requirement
64-bit versions of the following operating systems are supported,
- Microsoft Windows Server 2019
- Microsoft Windows Server 2016
- Microsoft Windows Server Semi-Annual Channel (including version 1903)
- Microsoft Windows Server 2012 R2
- Microsoft Windows Server 2012
- Microsoft Windows 2008 R2 SP1
- Microsoft Windows 10 (starting from version 1607 up to version 1909)
- Microsoft Windows 8.1
- Microsoft Windows 7 SP1
SQL Server
Local or remote installation of the following versions of Microsoft SQL Server (both Full and Express Editions are supported):
- Microsoft SQL Server 2019
- Microsoft SQL Server 2017
- Microsoft SQL Server 2016 (Microsoft SQL Server 2016 SP1 Express Edition is included in the setup)
- Microsoft SQL Server 2014 with Microsoft SQL Server 2014 Management Objects and Microsoft System CLR for SQL Server 2014
- Microsoft SQL Server 2012 (Microsoft SQL Server 2012 SP4 Express Edition is included in the setup)
- Microsoft SQL Server 2008 R2
- Microsoft SQL Server 2008
Other Software
- Microsoft .NET Framework 4.7.2 (included in the setup).
- Microsoft Internet Information Services 7.5 or later: support for extensionless URLs for IIS 7.5 or later, ASP.NET 4.5, .NET Extensibility 4.5 for IIS 8.0.
- Directory Browsing component, Default Document component, HTTPS Errors component, Static Content component, Windows Authentication component, WebSocket Protocol component.
Let’s begin with Enterprise Manager deployment.
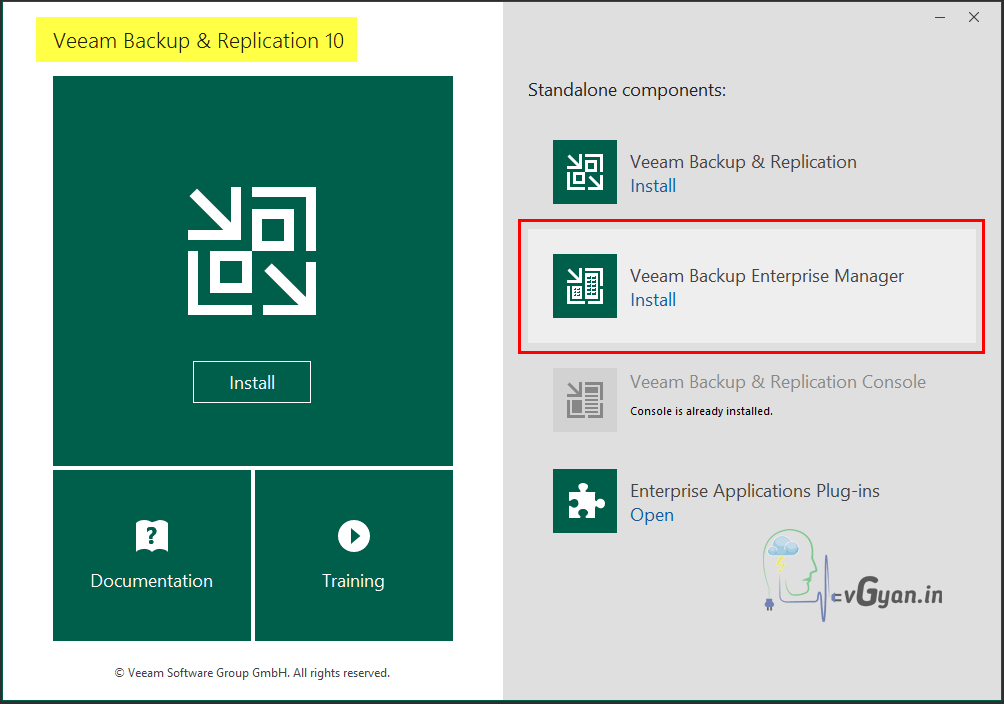
Mount download Veeam Backup and Replication v10 ISO and run the Setup file with administrator privilege.

Veeam Backup and Replication v10 installation wizard has four options to choose from.
1. Veeam Backup & Replication
2. Veeam Backup Enterprise Manager
3. Veeam Backup & Replication Console
4. Enterprise Application Plugin
Now I am currently going to install Veeam Backup Enterprise Manager, Select Veeam Backup Enterprise Manager.
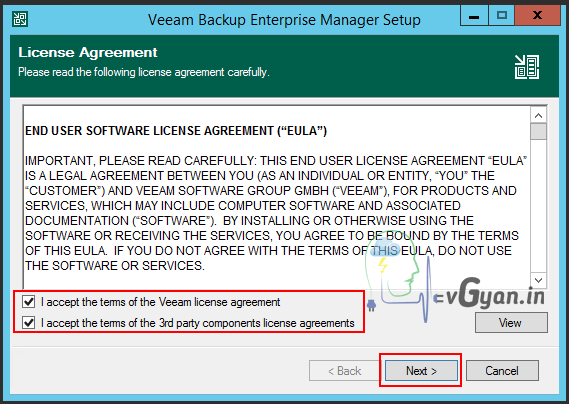
Accept the Veeam license agreement and click Next.
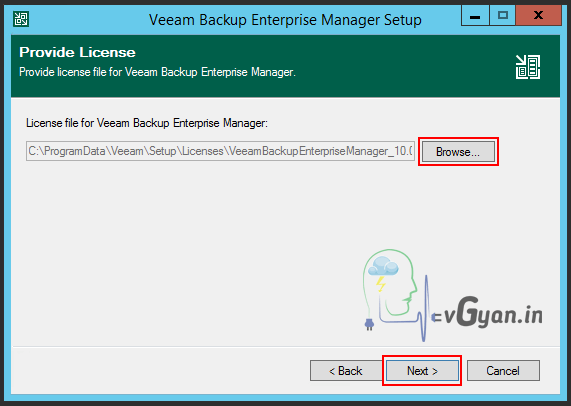
Browse and select the license file, Click Next to continue. If you are installing Enterprise manager along with Backup server license will be automatically populated.
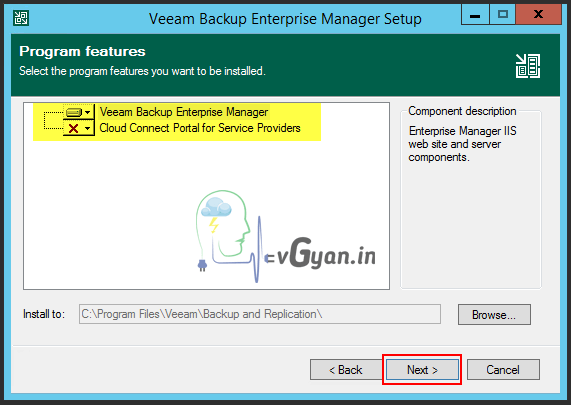
Select installation directly and click Next. Here I am not including Cloud connect portal for service providers feature.
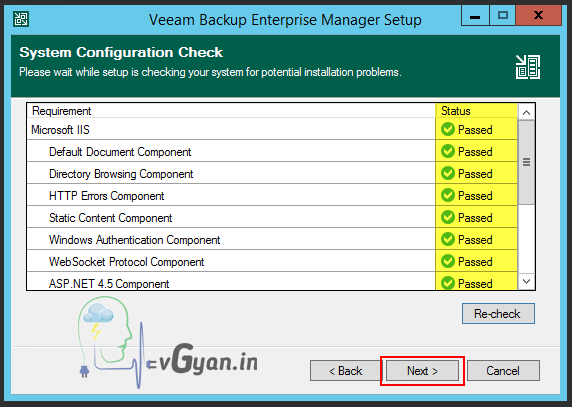
In the system configuration check field, if any requirements are failed click on install. This will automatically install all the required components.

Once all the configuration checks are passed, click Next to continue.
Provide service account details and click Next. I am using the local system account and its recommended, but when we install for the production environment we may use service accounts.

Specify SQL Server details, I am using existing SQL Server which is deployed along with Veeam Backup Server. Provide database name and select authentication credentials according to your environment.
Click Next to continue.

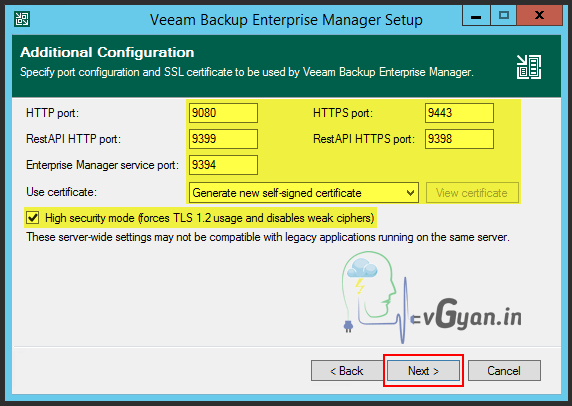
Specify port configurations, SSL certificate, and click Next to continue.
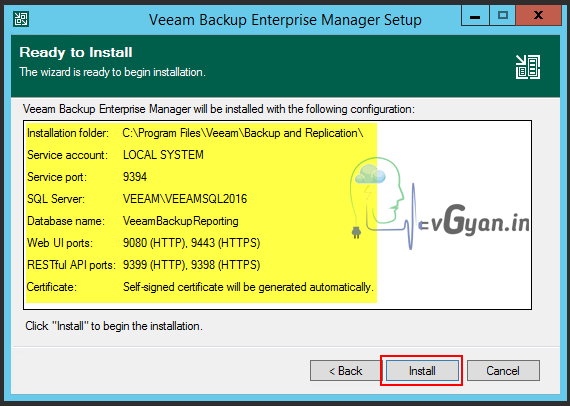
Once settings completed click on the Install button.
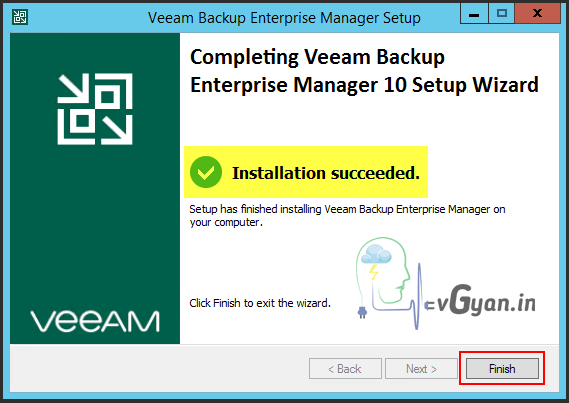
Veeam Backup Enterprise Manager installation takes some time to complete.
Once installation succeeded, Click finish to come out of setup wizard.
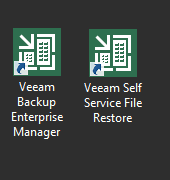
In the desktop where we installed Enterprise Manager, you will be able to find two shortcuts,
- Veeam Backup Enterprise Manager
- Veeam Self Service Restore
Both shortcuts are taking us to a web-based portal and the URL is https://<Server FQDN>:9443/login
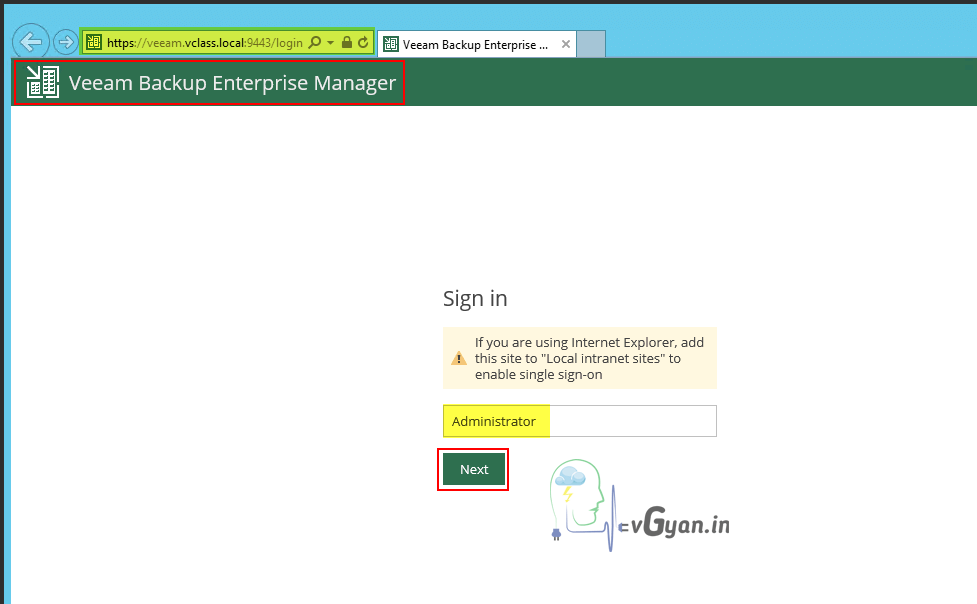
In the Veeam Backup Enterprise Manager web page, provide the user name and click Next.
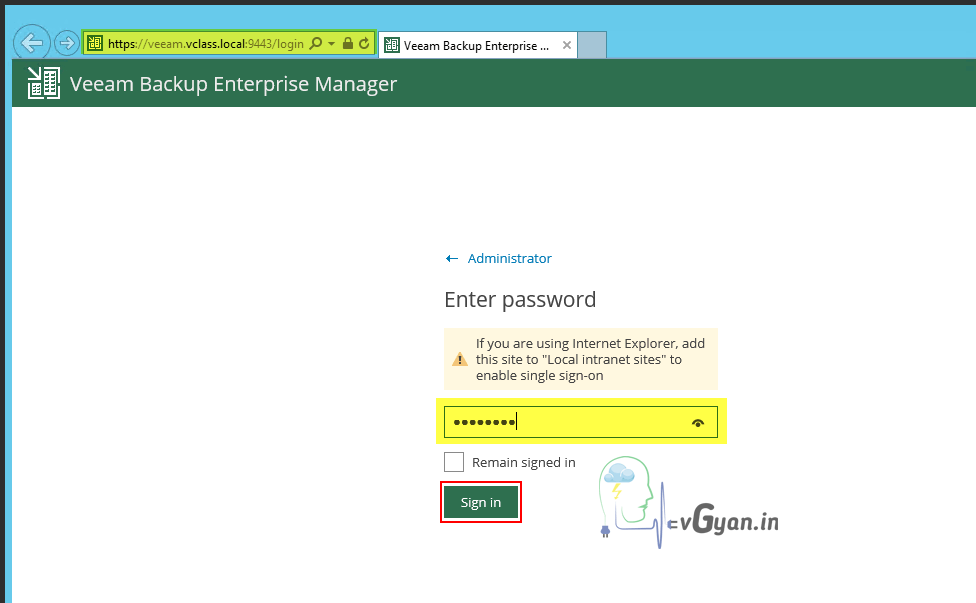
Provide the password and click on Sign in. Normally user name and password we provide on the same page but here it’s different.
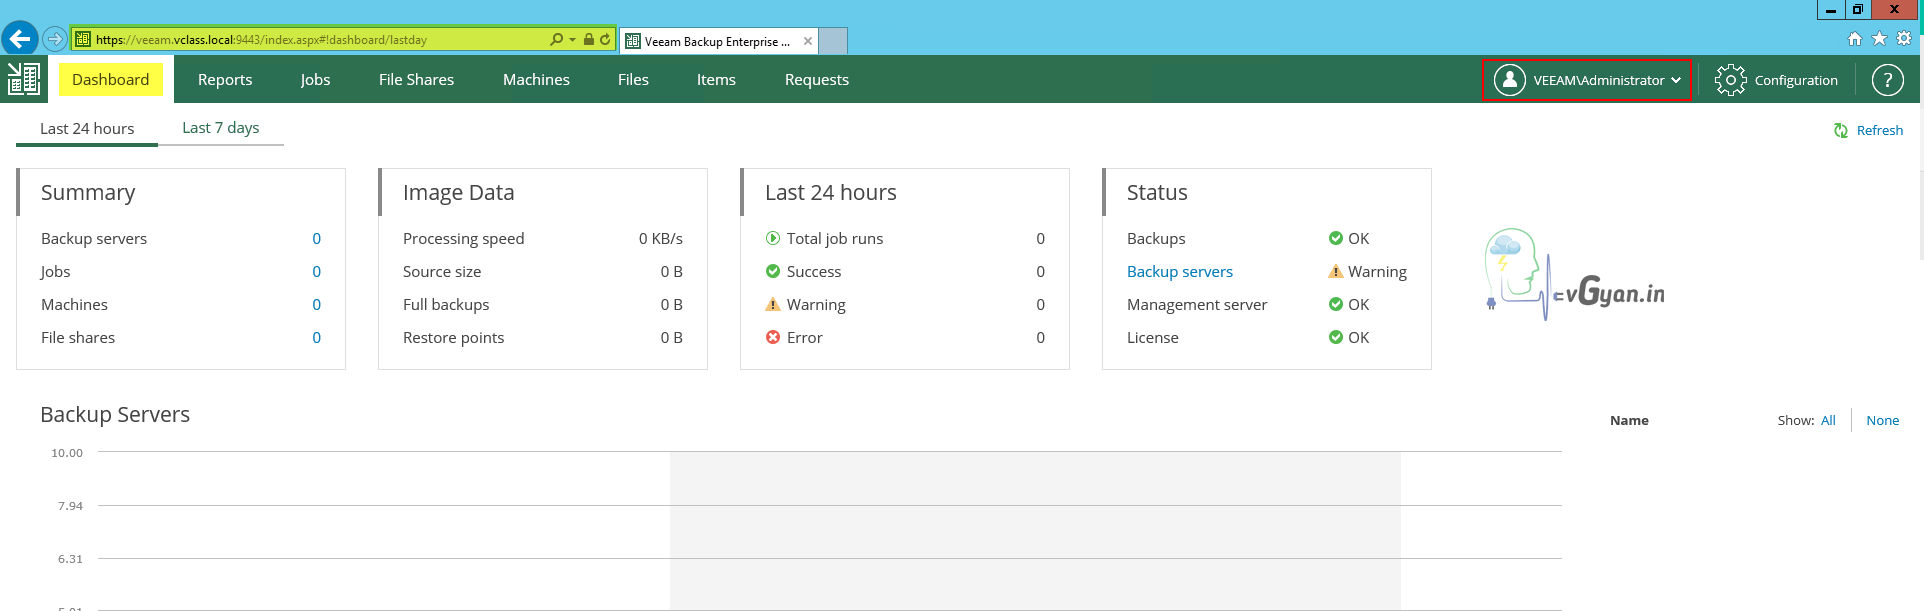
Now we are in Veeam Backup Enterprise Manager web console, which has a lot of options and we will discuss that later.
Here is the official video from Veeam – Veeam Backup & Replication – Installation (Enterprise Manager Installation from 11 min)
Video Credit: Veeam Official YouTube Channel
That’s all guys.. will discuss more on Veeam Backup and Replication v10 in an upcoming post, stay tuned… 
I hope you enjoyed reading this post. Feel free to share this with others if it is worth sharing!!!
